

For the last post in this model photography series, I’m turning my unforgiving lens on my own middle-aged self (gulp). When it comes to shooting jewelry on the body, some would say leave it to the youngsters or leave it to the pros. Judging from the images we’re bombarded with at every turn, a woman should never attempt the jewelry selfie after age 40.
Trust me, it’s easier to get a good image of jewelry on a younger woman. But I don’t always have one handy, and sometimes I feel like… I don’t know, maybe we need a little reality? After all, it’s women my age who buy and wear much of the jewelry I show on this site. Is there not a way to find the beauty in my own demographic – or even my mother’s?
A few years ago, I began shooting jewelry on my hand. There were pieces that begged to be shown in context. I’ve been shooting jewelry on this hand since 2006 when I reported on a famous Christie’s auction. Here is an unretouched, unfiltered example from my Instagram a couple years ago. I’ve posted so many shots of this hand since then, I should start a #mylefthand hashtag. My right hand holds the phone.
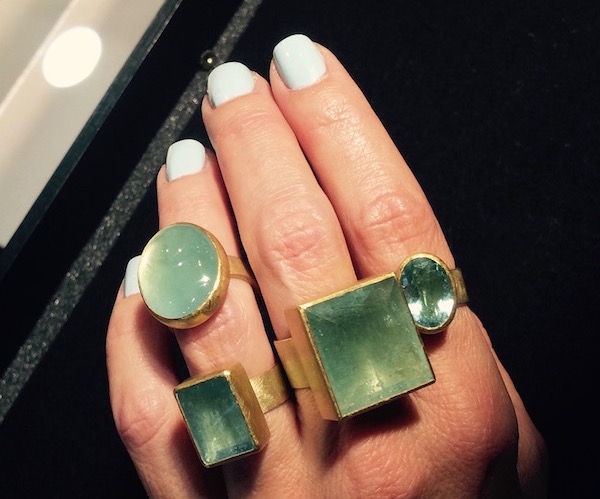 Rings of aquamarine and brushed 18k gold by Petra Class – on my hand at the PMA Craft Show
Yup, after years of lugging around a Nikon and then a Canon Rebel, I’ve been shooting these with my iPhone and sometimes a little $40 clip-on macro lens. Monica Stephenson of idazzle turned me onto that gadget at a World Gold Council conference one year. Be warned: It will not only show every inclusion in the stone and brush stroke on the metal but every pore and crease on your hand as well.
I drew the line at photographing my hand until a couple years ago at the Couture show. I’d been trying on jewelry then photographing it on the 20something women who work those booths, until someone offered to take it on me. A couple of those shots turned out surprisingly well. (A good sales assistant these days not only knows the inventory but also how to style a shot, work a smart phone, and shoot for the Instagram crowd.) I posted one from the show floor and it got a warm response.
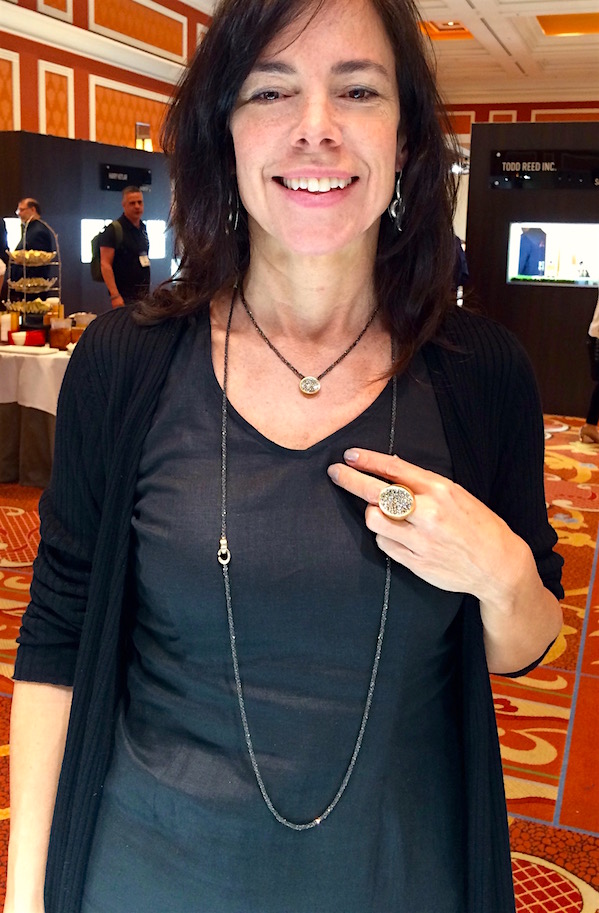
The image at the top of this page was taken by a male sales staffer at Todd Reed’s booth at that show. Since I couldn’t ask him to model these jewels for me, I handed him my phone, and sat on a stool.
Granted, that is an amazing collection and most people were “liking” the jewelry itself. But I believe a large part of the success of Todd’s work is that it looks as good on the female body as it does in the case. And, y’know, that is what it was designed for: to be worn by a living, breathing, non-airbrushed female. To me, that is the true test of a piece of jewelry.
I used a filter on that shot to bleach out the shadows. See that brown patch on my hand? I was in such deep shadow, it looked like a birthmark in the original. Trade show lighting is wicked. (My advice if you find yourself shooting indoors under track lights: back up a bit and get out of the spotlight.)
The right filters do wonders to even out skin tone without erasing all detail. I hate that fake blurred effect left by overuse of the eraser tool. I like that you can still see my freckles and the texture of my skin. My goal is to show jewelry not in the photoshopped perfection of a magazine ad but the way it looks on a real, live woman.

This image of me wearing jewelry by Colette was taken by the playful sales staff who work that designer’s booth. It too was filtered and cropped but not retouched. It takes a few shots to get one I can use, but guess what? It always takes a few, even when you’re photographing flawless youth. A good assistant knows to keep shooting. A really good one adjusts your hair a bit and suggests you move your hand up or down slightly or shift your body to the left, out of the shadow.
Here’s a shot of me from the Couture Show in Vegas wearing a new black-diamond collection by Antonini of Milano (with my own earrings by Shana Kroiz). At the time, I posted this with a joke about how beautiful jewelry can light me up even after being up all night on a red-eye flight. My eyes were glazed but the smile was real. People responded to the jewelry – and this particular jewelry was made to be worn, with a simple linen dress like I was wearing.
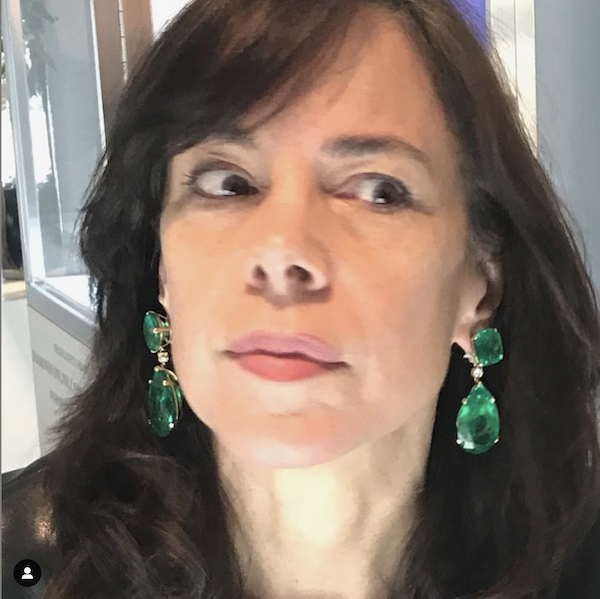 Trying on emerald earrings that sold for $750,000 at Sotheby’s in 2018
And here’s another example of handing my phone over to the nice lady behind the counter, this time at a Sotheby’s auction preview. I later cropped this image way down, from an original that showed my whole body and the room behind – but didn’t get close enough to the jewels. My goal was to show the shape of those enormous emeralds and the mount designed by Verdura. This photo was not retouched in any way but for some reason, the crop shows the earrings in detail but goes easy on my face – win, win!
If you’re shooting jewelry, keep the focus on the jewelry, even in the photo editing stage. If you have to, crop radically. Often you lose detail this way, but if you get lucky – or the shooter is careful – the focus is tighter on the jewels than the face.
My flesh is more textured than it once was and carries souvenirs from various mishaps and decades in the wind and sun. I’m well-traveled and I’ve had my share of sleepless nights. My hands have worked hard, soaked in darkroom chemicals, dug up a dozen gardens. Mostly, I’m just getting older, like everyone else lucky enough to stick around a while.
But I’d like to think I have a different kind of beauty now, just as you do. It’s a little harder to photograph but I’m learning. Fortunately, I know my way around basic photo-editing tools after many years of touching up images for publication. Using just the tools that come bundled on your computer or mobile device, you can easily crop and sharpen and saturate. Worse case scenario, there are these things on Instagram called “filters,” haha.
When skin texture gets to the point of detracting from the jewelry, however, as I’m increasingly finding mine does, there are tricks to softening and correcting without erasing the fact that it’s human flesh . My iPhone has an eraser tool that lets me selectively erase small flaws. Go too far, though, and Eraser is prone to creating the scary distortions we associate with AI. Remember to save your edits and click the ‘go back’ arrow to correct a mistake.
If you need something to soften all flesh in an image without losing the sharpness of the jewelry, I find Photoshop Elements works best. I used to use the software version of this but lately I’ve been relying on the app on my phone. You can select just “skin” in an image and use a slider to soften it. I love this because it doesn’t let you go too far. Slide that thing as far left as it goes and the flesh still looks human. Photoshop doesn’t even let you overcompensate. Frankly, if that doesn’t do the trick, I’d probably best not use that image.
Where jewelry is concerned, good product shots are crucial. But for the same reason I’m always harping on about wearability, I believe there is something lacking when you rely solely on product shots. They present jewelry as an object to be admired in the abstract. But jewelry is not something we hang on the wall or put on a pedestal. We hang it from our necks, ears and wrists, pin it to our lapels and stack it on our fingers. And by “we,” I don’t mean just flawless 25-year-olds.
If I can pull this off, so can you.
This page contains affiliate links.
My photography equipment as of 2026
Apple iPhone 16 Pro, 256GB – Unlocked (Renewed)